⌦ 기록장 페이지

☑︎ 운동 개수를 기록장에 기록해 주는 기능
• 목표 개수를 달성했을 때

목표 개수를 달성하면 화면이 멈추고 2초 뒤에 성공화면이 뜨면서 record(기록) 버튼과 exit(home 화면으로 돌아가기) 버튼이 뜬다. record 버튼을 누르면 기록장으로 이동하며, 측정 기록이 저장된다.

• 목표 개수를 달성하지 못했을 때

목표 개수를 달성하지 못해도 기록하기 버튼을 누른 뒤, RECORD 버튼을 누르면 기록장에 기록은 할 수 있다. 마찬가지로 기록장으로 이동하며, 측정기록이 자동으로 저장된다.
- Controller
@RequestMapping(value = "count",
        method = RequestMethod.POST,
        produces = MediaType.APPLICATION_JSON_VALUE)
@ResponseBody
public String postSquat(@SessionAttribute(value = "user", required = false) UserEntity user, CountEntity count) throws ParseException {

    count.setUserEmail(user.getEmail());

    // 현재 날짜
    Date date = new Date();
    SimpleDateFormat formatter = new SimpleDateFormat("yyyy-MM-dd");

    // 문자열 -> Date
    String nowDate = formatter.format(date);
    Date now = formatter.parse(nowDate);

    count.setTodayDate(now);

    Enum<?> result;
    JSONObject responseObject = new JSONObject();

    result = this.recordService.insertCount(count);

    responseObject.put("date", nowDate);
    responseObject.put("result", result.name().toLowerCase());

    return responseObject.toString();
}
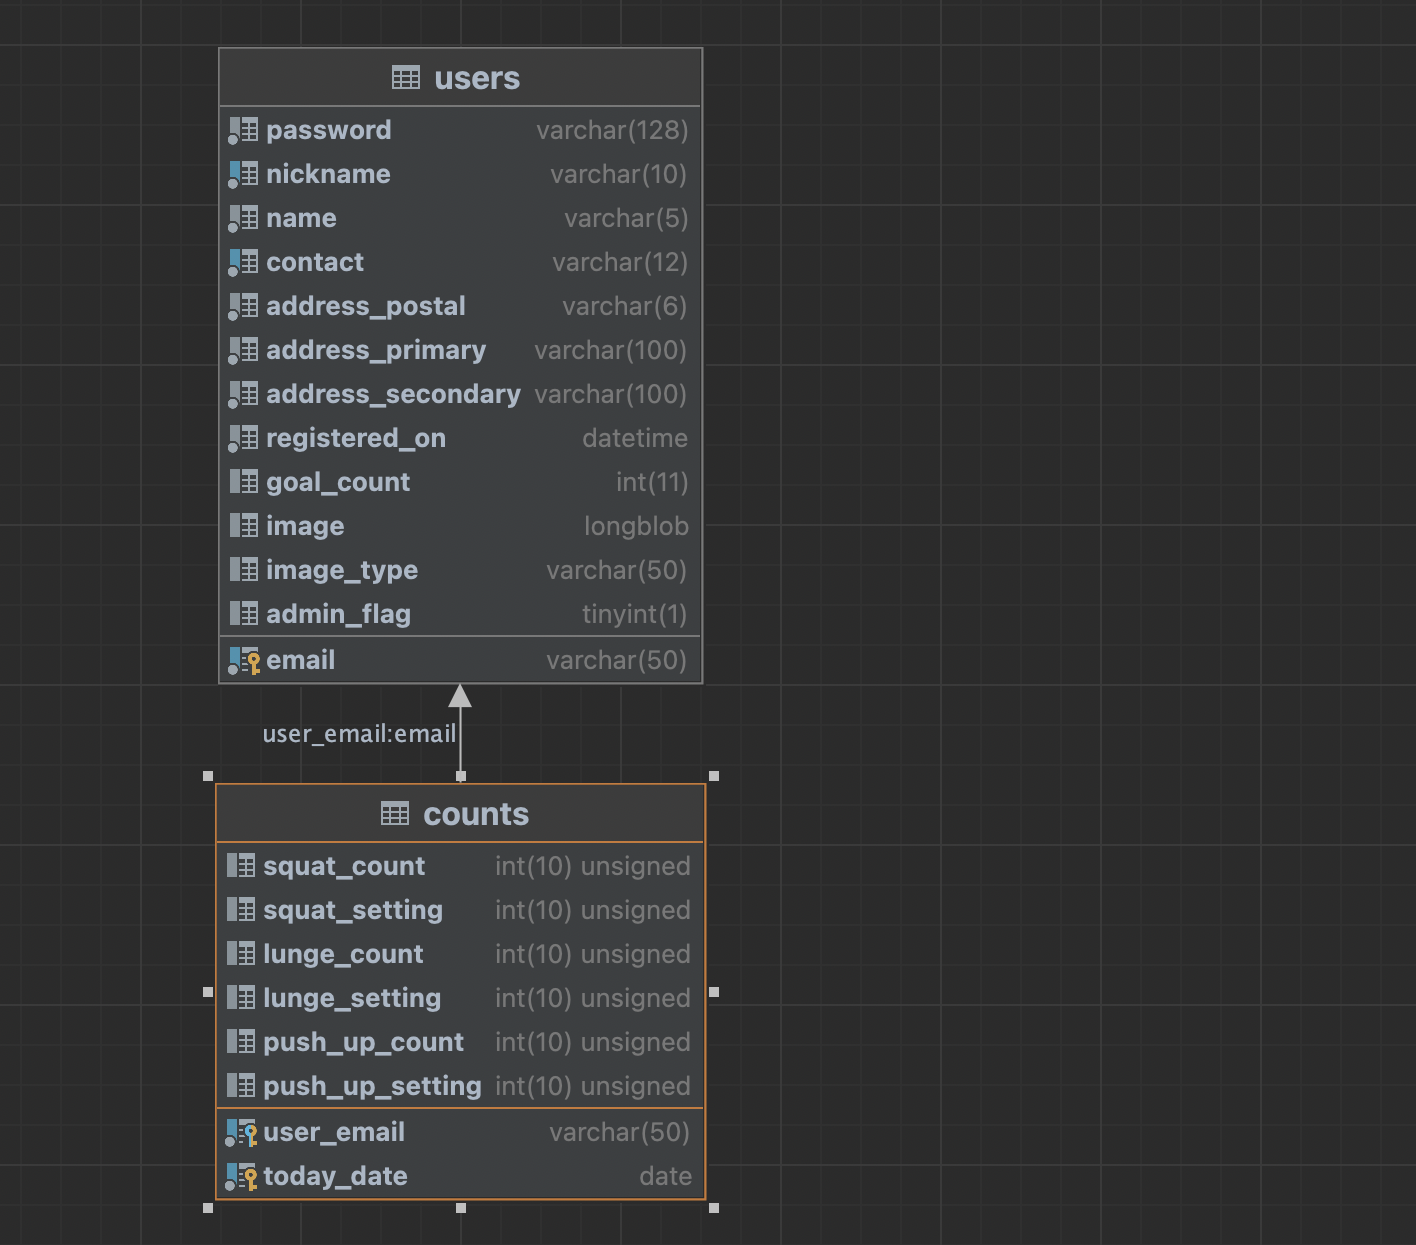
counts table 의 user_email 은 user table 의 email 을 외래키로 받고있다. 기록장 페이지는 운동 개수 측정 페이지에서 넘어가면서 기록되는 페이지라서 counts table 의 user_email 에 session user(email) 의 정보를 넣어준다.
기록장은 오늘의 정보만 입력이 가능하다. 하루하루 습관을 만드는 취지로 만들어졌기 때문에 지난 날짜에 기록을 하는 일은 불가능하다. 그래서 항상 개수 정보를 디비에 넘겨줄 때는 현재 날짜가 들어가야 한다. 그것을 controller 에서 처리하도록 했다. Java 의 Date 타입은 내가 출력하고자 하는 "yyyy-MM-dd" 형태가 아니기 때문에 SimpleDateFormat 을 이용하여 바꿔줬다. 바꾼 날짜형식도 email 과 마찬가지로 운동 개수를 기록할 때 기록장으로 넘어가면서 같이 넘어가도록 setter 를 사용하여 넣어줬다.
그리고 따로 문자열로도 바꾼 이유는 (nowDate) 기록장 페이지 주소에 써먹기 위해서다. javascript 에서 활용할 것이기 때문에 JSONObject 에 "date" 가 키인 값으로 문자열 nowDate 를 넣어줬다.
- Service
public Enum<? extends IResult> insertCount (CountEntity count) {

    return this.recordMapper.insertCount(count) > 0
            ? CommonResult.SUCCESS
            : CommonResult.FAILURE;
}
- Mapper, xml
int insertCount(CountEntity count);<insert id="insertCount"
parameterType="com.blackgreen.dios.entities.record.CountEntity">
INSERT INTO `dios_record`.`counts` (`user_email`, `today_date`, `squat_count`, `squat_setting`, `lunge_count`,
`lunge_setting`, `push_up_count`, `push_up_setting`)
VALUES (#{userEmail}, #{todayDate}, #{squatCount}, #{squatSetting}, #{lungeCount}, #{lungeSetting},
#{pushUpCount}, #{pushUpSetting})
ON DUPLICATE KEY UPDATE `squat_count` = `squat_count` + #{squatCount},
`squat_setting` = `squat_setting` + #{squatSetting},
`lunge_count` = `lunge_count` + #{lungeCount},
`lunge_setting` = `lunge_setting` + #{lungeSetting},
`push_up_count` = `push_up_count` + #{pushUpCount},
`push_up_setting` = `push_up_setting` + #{pushUpSetting}
</insert>DIOS 는 운동 종류가 세개이며, 각각 squat, lunge, push up 페이지가 세개로 나눠져 있지만 쿼리는 하나로 사용할 수 있게 짰다. table 을 만들 때 목표 개수(setting)와 count 모두 default 0 으로 만들었다.
생각해야 할 것은 하루에 여러번 목표를 설정하고 달성할 수 있다는 점이었다. 그렇게 되면 기존에 저장되어있던 목표 개수(setting)에 추가된 목표 개수를 더해야했다. 실제 운동 개수(count)도 마찬가지로 기존에 저장되어있던 운동 개수에 더해서 추가되어야 한다. update 로도 할 수는 있겠지만 더 간단한 방법이 있을 것 같아서 쌤께 여쭤봤는데 insert 에 duplicate 를 쓰면 굳이 controller 와 service 에서 난리치지 않아도 정말정말 간단하게 사용할 수 있었다.
✔️ INSERT INTO ... ON DUPLICATE UPDATE
: 중복 레코드를 관리할 수 있는 방법이다. 이 방법은 중복키 오류 발생 시 사용자가 원하는 값을 직접 설정할 수 있다.
나는 기존에 있던 값에 새로 들어온 값을 더하는 쿼리를 짜야했기 때문에 `squat_count` = `squat_count` + #{squatCount} ( 만약 squat_count 의 값이 중복되면 squat_count(기존 값) + #{squatCount}(새로 들어온 값) 로 바꾸기) 의 형태로 짰다.
- JavaScript : 목표 개수 달성했을 때
const goRecord = document.querySelector('[rel="goRecord"]');

goRecord.addEventListener('click', e => {
    e.preventDefault();

    const xhr = new XMLHttpRequest();
    const formData = new FormData();

    formData.append('squatCount', count);
    formData.append('squatSetting', goal);

    xhr.open('POST', './count');

    xhr.onreadystatechange = () => {
        if (xhr.readyState === XMLHttpRequest.DONE) {
            if (xhr.status >= 200 && xhr.status < 300) {
                const responseObject = JSON.parse(xhr.responseText);
                switch (responseObject['result']) {
                    case 'success':
                        const date = responseObject['date']
                        window.location.href = `recordBook?dt=${date}`;
                        break;
                    default:
                        alert('알 수 없는 이유로 실패');
                }
            } else {
                alert('서버와 통신 실패');
            }
        }
    }
    xhr.send(formData);
});
- JavaScript : 목표 개수 달성하지 못했을 때
const recordButton = document.querySelector('[rel="recordButton"]');
const stopRecord = document.querySelector('[rel="stop"]');
const stopRecordButton = document.querySelector('[rel="stopRecord"]');
const continueButton = document.querySelector('[rel="continue"]');

recordButton.addEventListener('click', e => {
    e.preventDefault();

    stopRecord.classList.add('visible');

    // 그냥 중단하고 기록한다고 했을 때
    // (? 붙이는 이유는 조건부라서 : 버튼이 보일 때도 있고 안 보일 때도 있기 때문에)
    stopRecordButton?.addEventListener('click', e => {

        e.preventDefault();

        const xhr = new XMLHttpRequest();
        const formData = new FormData();

        formData.append('squatCount', count);
        formData.append('squatSetting', goal);

        xhr.open('POST', './count');

        xhr.onreadystatechange = () => {
            if (xhr.readyState === XMLHttpRequest.DONE) {
                if (xhr.status >= 200 && xhr.status < 300) {
                    const responseObject = JSON.parse(xhr.responseText);
                    switch (responseObject['result']) {
                        case 'success':
                            const date = responseObject['date']
                            window.location.href = `recordBook?dt=${date}`;
                            break;
                        default:
                            alert('알 수 없는 이유로 실패');
                    }
                } else {
                    alert('서버와 통신 실패');
                }
            }
        }
        xhr.send(formData);
    });

    // continue 버튼 눌러서 계속하기
    continueButton.addEventListener('click', e => {
        e.preventDefault();

        stopRecord.classList.remove('visible');

    });

});
2023.02.23 - [웹개발] - [웹개발 - DIOS] Teachable Machine 를 이용한 운동 개수 세는 페이지
[웹개발 - DIOS] Teachable Machine 를 이용한 운동 개수 세는 페이지
⌦ Teachable Machine 를 이용한 운동 개수 세는 페이지 ☑︎ Teachable Machine https://teachablemachine.withgoogle.com/ Teachable Machine Train a computer to recognize your own images, sounds, & poses. A fast, easy way to create machine learni
pickmeplease.tistory.com
FormData 에는 운동의 종류에 맞게 각 페이지에서 count와 goal 의 값이 들어간다(count 와 goal 의 값은 위 글 참조).
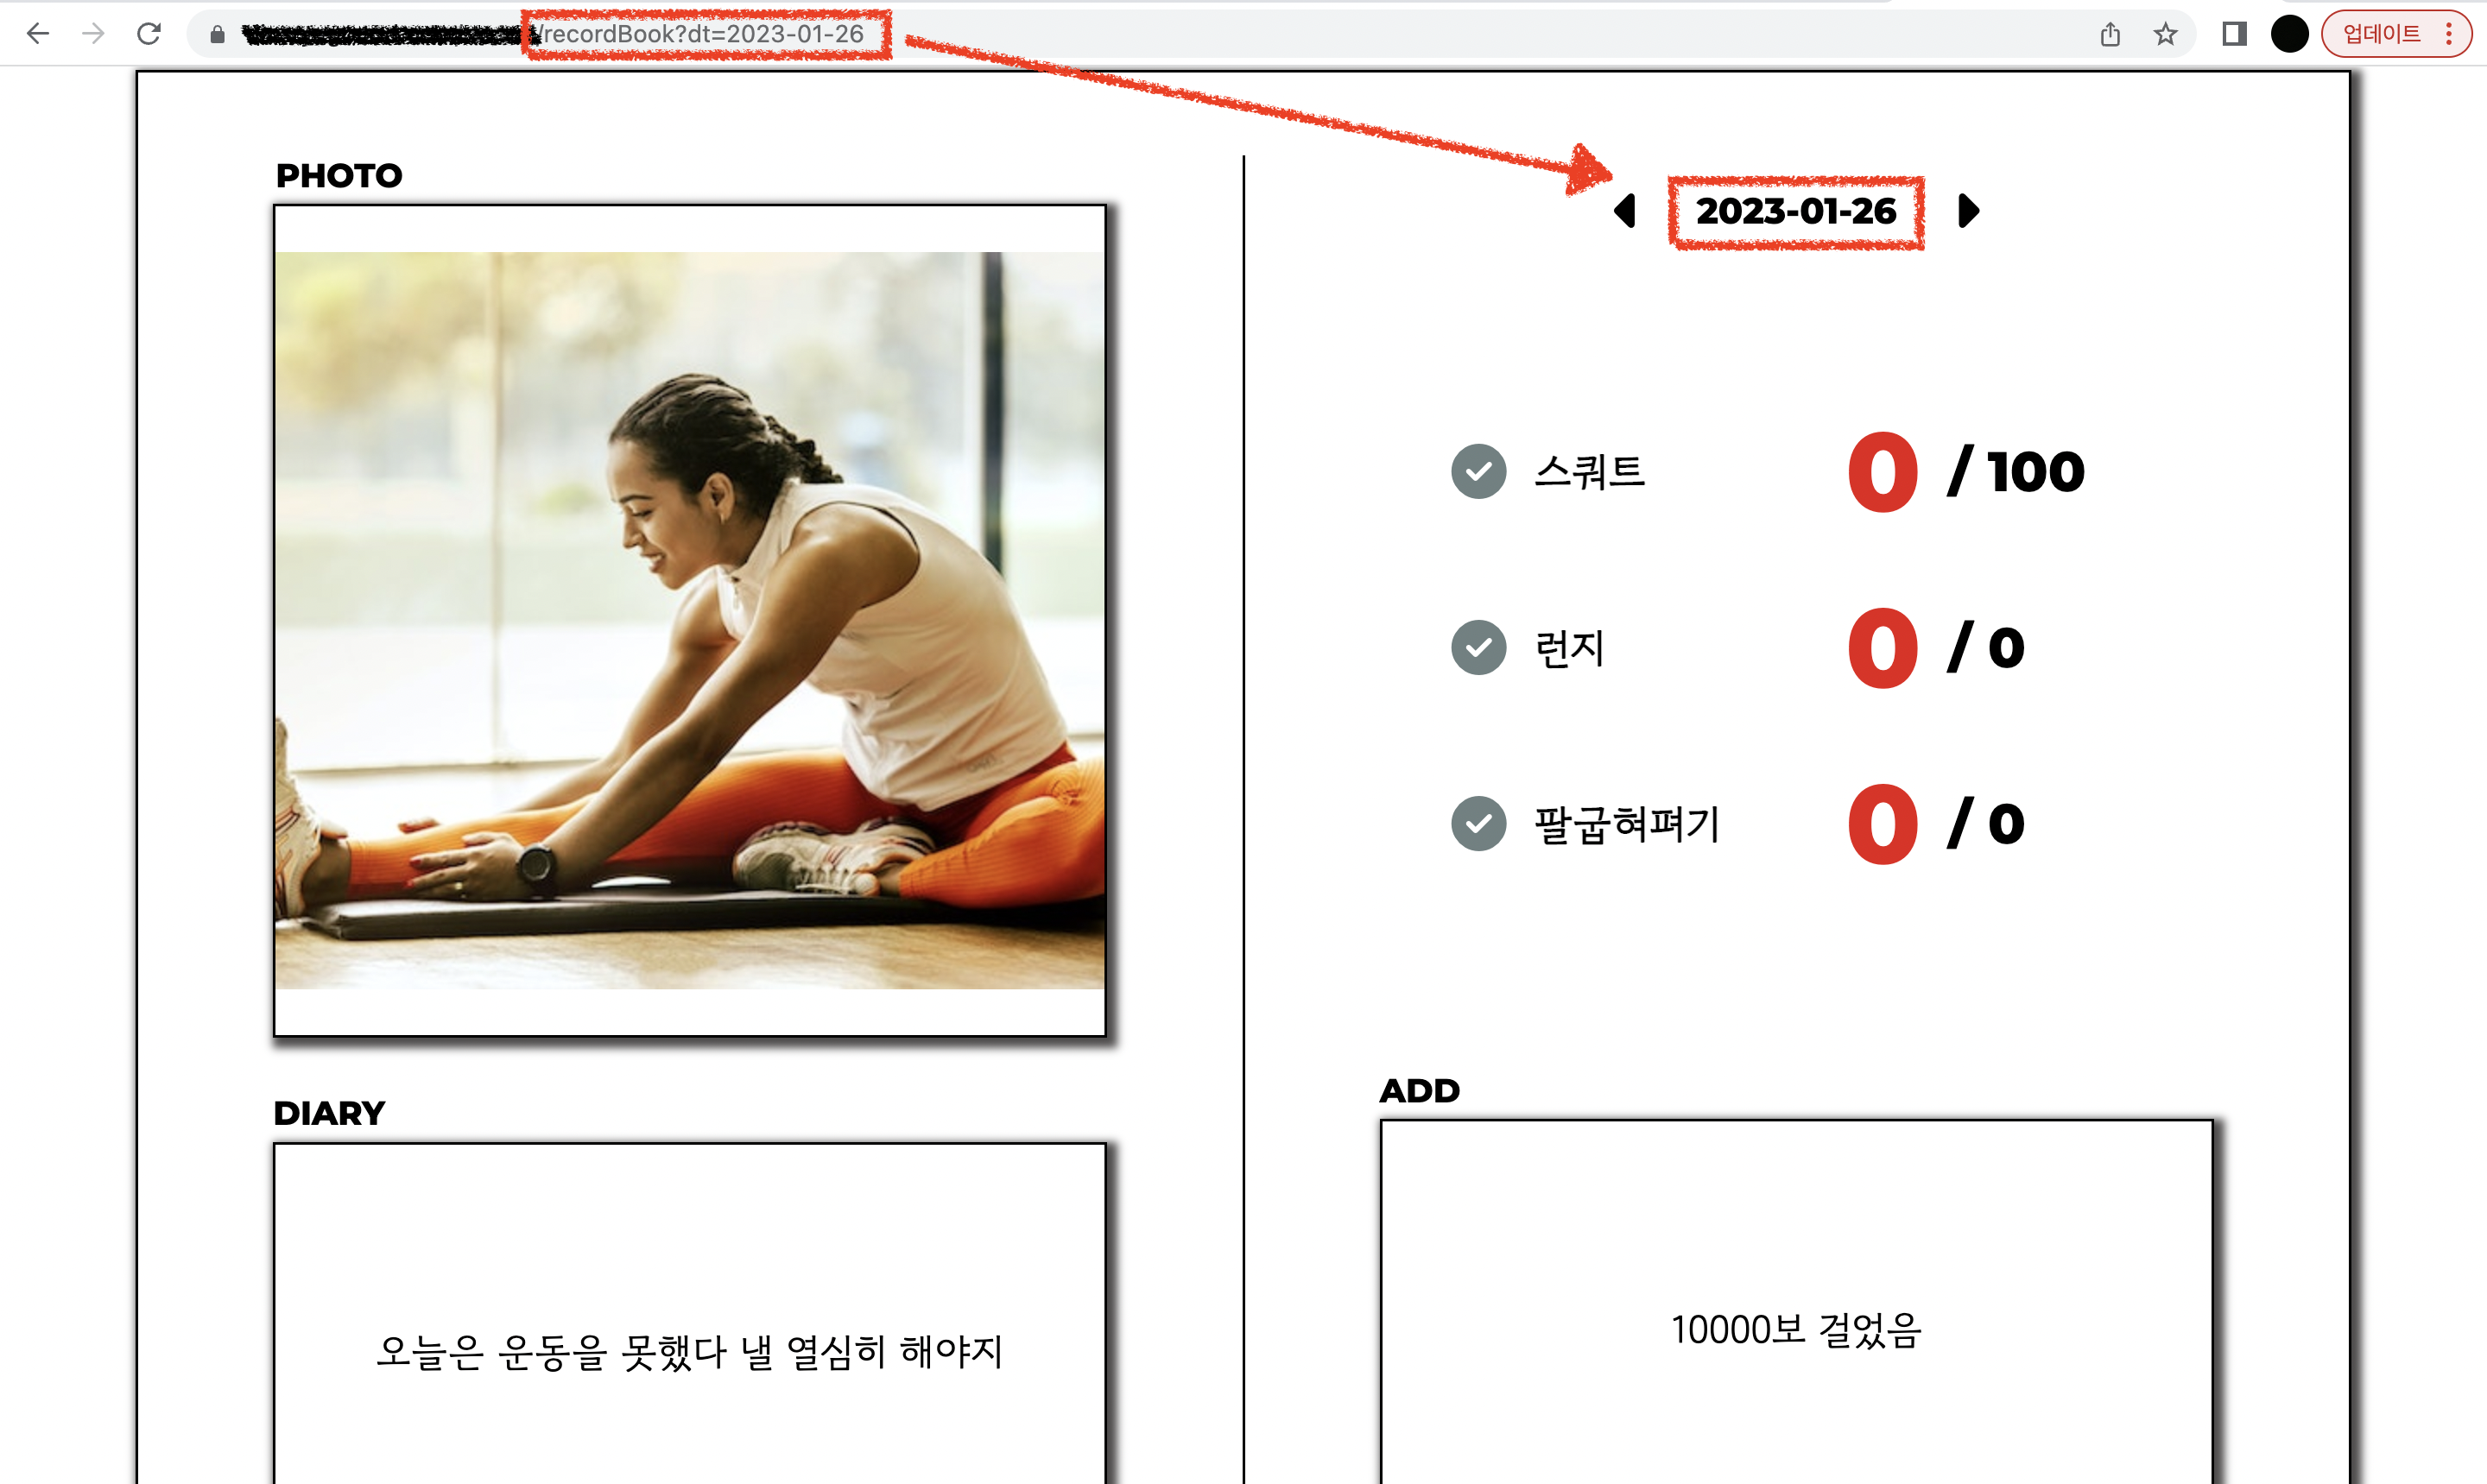
값이 잘 들어가면 `recordBook?dt=${date}` 의 주소로 이동한다. 이 date 안에 들어가는 값이 controller 에서 JSONObject 에 넣어준 String 형태의 날짜 값이다. 지난 날짜에 기록을 할 수는 없지만 볼 수는 있도록 하기 위해서 dt 뒤의 날짜 값에 따라 운동 개수가 기록장에 select 되게 하기 위해 만들어 둔 것이다.
✔️ 주소창 URL 에서의 물음표(?) 와 등호(=)
물음표(?) : GET 변수 쿼리의 시작, DB 에서 데이터를 요청한다.
등호(=) : 값 입력, 쿼리에서 파라미터의 값을 입력시켜 준다.
☑︎ 기록 작성, 수정, 삭제 기능
• 사진 등록


- JavaScript
insertPhotoContainer['images'].addEventListener('input', () => {
    const imageContainerElement = insertPhotoContainer.querySelector('[rel="photoContainer"]');
    imageContainerElement.querySelectorAll('img.image').forEach(x => x.remove());

    const imageSrc = URL.createObjectURL(insertPhotoContainer['images'].files[0]); //하나만 올라갈꺼니까 0번째

    document.getElementById('insertPhoto').setAttribute('src', imageSrc);

});
insertPhotoContainer.onsubmit = e => {
e.preventDefault();
// 이미지를 선택하지 않았을 때
if (( insertPhotoContainer['images'].files?.length ?? 0) === 0) {
ip.classList.add('blank');
setTimeout(()=>{
ip.classList.remove('blank');
},200);
return;
}
const xhr = new XMLHttpRequest();
const formData = new FormData();
formData.append('images', insertPhotoContainer['images'].files.length > 0 ? insertPhotoContainer['images'].files[0] : null);
xhr.open('POST', './photo');
xhr.onreadystatechange = () => {
if (xhr.readyState === XMLHttpRequest.DONE) {
if (xhr.status >= 200 && xhr.status < 300) {
const responseObject = JSON.parse(xhr.responseText);
switch (responseObject['result']) {
case 'success' :
insertPhotoContainer.classList.remove('visible');
const date = responseObject['date'];
window.location.href = `recordBook?dt=${date}`;
break;
default:
alert('오류가 발생했습니다.');
}
} else {
alert('서버와 통신 오류가 발생했습니다.');
}
}
}
xhr.send(formData);
};
• 사진 수정


사진 수정과 삭제는 사진을 첨부 한 뒤에 가능한 기능이므로, 사진을 첨부하기 전엔 보이지 않고 첨부 했을 때만 보인다.
- HTML
<div class="button-container" th:if="${element.getImage() != null && currentDate == date}">
    <i rel="modifyPhoto" class="modify fa-regular fa-image"
       th:if="${element.getImage() != null && element.getImage().length > 0}"></i>
    <i rel="deletePhoto" class="delete fa-solid fa-trash"
       th:if="${element.getImage() != null && element.getImage().length > 0}"></i>
</div>
일단 수정 버튼과 삭제 버튼을 묶은 div 에는 타임리프를 사용한 if 조건으로 th:if="${element.getImage() != null && currentDate == date}" 를 넣었다. 이미지가 있거나, 현재 날짜가 페이지의 날짜와 같아야 뜬다는 뜻이다. 현재 날짜가 아니라면 사진이 있더라도 수정하거나 삭제할 수 없기 때문에 넣어 준 조건이다.
- Controller
// 페이지 날짜
Date date = new SimpleDateFormat("yyyy-MM-dd").parse(dtStr);;
SimpleDateFormat formatter = new SimpleDateFormat("yyyy-MM-dd");

// 현재 날짜
Date date2 = new Date();
final String email = user.getEmail();
CountEntity count = this.recordService.getCount(email, date);
ElementEntity element = this.recordService.getRecords(email, date);


// 페이지 날짜와 현재 날짜가 같지 않으면 글 등록, 수정, 삭제 안 됨
// 페이지 날짜
modelAndView.addObject("date", formatter.format(date));
// 현재 날짜
modelAndView.addObject("currentDate", formatter.format(date2));
현재 날짜와 페이지의 날짜는 controller 에서 처리해줬다. 이 부분은 밑에 날짜별로 기록장을 보여주는 기능에서 다시 다뤄보겠다.
수정 버튼과 삭제 버튼 각각의 조건에는 th:if="${element.getImage() != null && element.getImage().length > 0}" 를 넣었다. 이미지가 null 이 아니고, 이미지의 길이가 0 이상이어야 뜬다는 뜻이다. 두 조건을 준 이유는 밑에 삭제부분에서 다루겠지만, 이미지가 아예 처음부터 비어있는 상태는 null 상태이고, 삭제된 상태는 null 이 아닌 ""의 값이기 때문이다. 이미지 삭제 버튼을 눌렀을 때, 실행되는 쿼리를 delete 가 아니고 insert 빈값("")으로 설정해서 그렇다.
- Controller
@PostMapping(value = "recordBook")
@ResponseBody
public String postRecordBook(@SessionAttribute(value = "user", required = false) UserEntity user,
                             @RequestParam(value = "dt", required = false) String dtStr,
                             ElementEntity element) throws ParseException {

    Enum<?> result;
    JSONObject responseObject = new JSONObject();

    // 날짜
    Date date;
    if (dtStr == null) {
        date = new Date();
    } else {
        date = new SimpleDateFormat("yyyy-MM-dd").parse(dtStr);
    }
    SimpleDateFormat formatter = new SimpleDateFormat("yyyy-MM-dd");

    String nowDate = formatter.format(date);


    if (user == null) {
        result = CommonResult.FAILURE;
    } else {

        element.setUserEmail(user.getEmail());
        element.setTodayDate(date);

        result = this.recordService.addRecord(user, element);
    }

    responseObject.put("result", result.name().toLowerCase());
    responseObject.put("date", nowDate);

    return responseObject.toString();
}
기록장에는 사진, 일기, 추가사항을 작성하고 수정할 수 있는데 다 따로 하지 않고 한 번에 처리가 가능하도록 했다.
당연히 user 가 null 이 아닐 때만 가능하고, 기록장의 "?dt=" 다음에 오는 String 형태의 날짜를 dtStr 로 받아와서 다시 Date 형식으로 바꾼 뒤 DB 에 넣어준다.
- Service
@Transactional
public Enum<? extends IResult> addRecord (UserEntity user, ElementEntity element){

    if (user == null) {
        return CommonResult.FAILURE;
    }

    return this.recordMapper.insertRecord(element) > 0
            ? CommonResult.SUCCESS
            : CommonResult.FAILURE;
}
- Mapper, xml
int insertRecord(ElementEntity element);<insert id="insertRecord"
parameterType="com.blackgreen.dios.entities.record.ElementEntity">
INSERT INTO `dios_record`.`record_elements` (`user_email`, `image`, `image_type`, `diary`, `add`, `today_date`)
VALUES (#{userEmail}, #{image}, #{imageType}, #{diary}, #{add}, IFNULL(#{todayDate}, DEFAULT(`today_date`)))
ON DUPLICATE KEY UPDATE `image` = IFNULL(#{image}, `image`),
`image_type` = IFNULL(#{imageType}, `image_type`),
`diary` = IFNULL(#{diary}, `diary`),
`add` = IFNULL(#{add}, `add`)
</insert>기록 요소들도 운동 개수와 마찬가지로 입력 insert, 수정 update 로 구분짓지 않고, 입력과 수정 모두 insert 를 사용했다. 모든 요소들을 한꺼번에 insert 하는 쿼리를 짰지만, 요소들의 입력과 수정은 모두 개별적으로 이루어지기 때문에 IFNULL 을 사용했다. 만약 들어오는 값이 null 이면 쉼표(,) 뒤의 값(기존에 있던 값)을 넣으라는 뜻이다.
이렇게 되면 javascript 의 내용은 당연히 사진 등록과 같은 코드로 사용할 수 있다.
• 사진 삭제


삭제는 신중하게 해야되는 거니까 진짜 삭제할거냐고 확인창이 한 번 뜨도록 했다.
- Controller
@RequestMapping(value = "image",
        method = RequestMethod.DELETE,
        produces = MediaType.APPLICATION_JSON_VALUE)
@ResponseBody
public String DeleteImage(ElementEntity element,
                          @SessionAttribute(value = "user", required = false) UserEntity user,
                          @RequestParam(value = "dt", required = false) String dtStr) throws ParseException {

    // 현재 날짜
    Date date;
    if (dtStr == null) {
        date = new Date();
    } else {
        date = new SimpleDateFormat("yyyy-MM-dd").parse(dtStr);
    }
    SimpleDateFormat formatter = new SimpleDateFormat("yyyy-MM-dd");

    String nowDate = formatter.format(date);

    element.setUserEmail(user.getEmail());
    element.setTodayDate(date);
    Enum<?> result = this.recordService.clearPhoto(user, element);

    JSONObject responseObject = new JSONObject();

    responseObject.put("date", nowDate);
    responseObject.put("result", result.name().toLowerCase());

    return responseObject.toString();
}
- Service
// photo 삭제
public Enum<? extends IResult> clearPhoto (UserEntity user, ElementEntity element) {

    if (user == null) {
        return CommonResult.FAILURE;
    }

    element.setImage(new byte[0]);  // byte[] 빈 값으로 바꾸는 방법
    element.setImageType("");

    return this.recordMapper.insertRecord(element) > 0
            ? CommonResult.SUCCESS
            : CommonResult.FAILURE;
}
삭제는 따로 delete 쿼리를 만들지 않고 사진 첨부, 수정할 때 만들어 놓은 insert 쿼리를 사용했다. 삭제 버튼을 누르면 service 에서 이미지 관련 정보가 모두 빈 값("")이 되도록 작성해줬다.
기록장 모든 요소 (Photo, Diary, Add)가 이와 같은 방식으로 돌아간다.
☑︎ 날짜 별로 기록장을 보여주는 기능

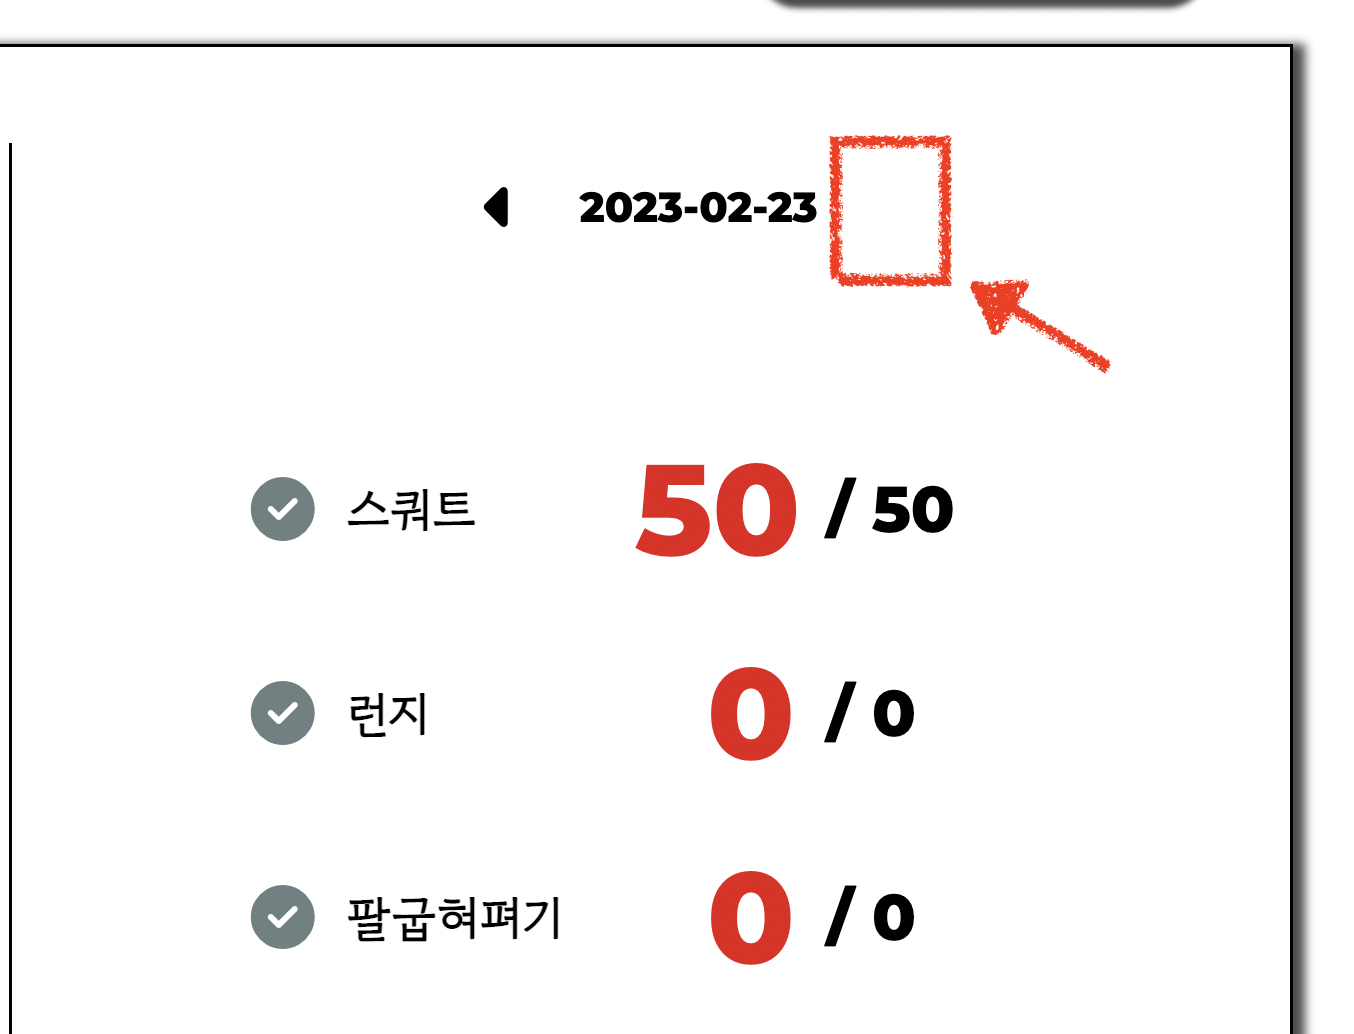
기록장은 날짜 별로 기록된 내용을 확인할 수 있으며, 날짜 옆에 있는 화살표를 눌러서 전 날짜와 후 날짜로 넘길 수 있다.
- Controller
@RequestMapping(value = "recordBook",
        method = RequestMethod.GET,
        produces = MediaType.TEXT_HTML_VALUE)
public ModelAndView getRecordBook(@SessionAttribute(value = "user", required = false) UserEntity user,
                                  @RequestParam(value = "dt", required = false) String dtStr) throws ParseException {
    ModelAndView modelAndView;

    // 현재날짜
    Date nowDate = new Date();

    if (user == null) {
        modelAndView = new ModelAndView("redirect:/dios/login");
        return modelAndView;
    } else if (dtStr == null) {
        // 기록장을 누르면 디비에 저장된 가장 최근 날짜로 들어가게 된다.
        Date date = this.recordService.getDate(user.getEmail(), nowDate);
        SimpleDateFormat formatter = new SimpleDateFormat("yyyy-MM-dd");
        String recentDate = formatter.format(date);

        modelAndView = new ModelAndView("redirect:/record/recordBook?dt=" + recentDate);

        return modelAndView;
    } else {
        modelAndView = new ModelAndView("records/recordBook");
    }

    // 페이지 날짜
    Date date = new SimpleDateFormat("yyyy-MM-dd").parse(dtStr);;
    SimpleDateFormat formatter = new SimpleDateFormat("yyyy-MM-dd");

    // 현재 날짜
    Date date2 = new Date();
    final String email = user.getEmail();
    CountEntity count = this.recordService.getCount(email, date);
    ElementEntity element = this.recordService.getRecords(email, date);


    // 만약에 아무것도 작성되지 않았을 땐 불러올 게 없으니까 일단 빈 엔티티 만들어줘야 500이 안 떠
    if (element == null) {
        element = new ElementEntity();
    }

    if (count == null) {
        count = new CountEntity();
    }

    modelAndView.addObject("element", element);
    modelAndView.addObject("count", count);

    // 페이지 날짜와 현재 날짜가 같지 않으면 글 등록, 수정, 삭제 안 됨
    // 페이지 날짜
    modelAndView.addObject("date", formatter.format(date));
    // 현재 날짜
    modelAndView.addObject("currentDate", formatter.format(date2));

    // 왼쪽 화살표 눌렀을 때 (이전 날짜로 가기)
    Date previousDate = this.recordService.getPreviousDate(email, date);
    String previousDateStr = previousDate == null ? null : formatter.format(previousDate);
    modelAndView.addObject("previousDate", previousDateStr);

    // 오른쪽 화살표 눌렀을 때 (다음 날짜로 가기)
    Date nextDate = this.recordService.getNextDate(email, date);
    String nextDateStr = nextDate == null ? null : formatter.format(nextDate);
    modelAndView.addObject("nextDate", nextDateStr);


    return modelAndView;
}
- Service
// 디비에 저장된 최근 날짜 불러오기
public Date getDate (String email, Date date) {

    // 기록장에 내용이 하나도 없으면 그냥 오늘날짜로 들어가게 하기
    if (this.recordMapper.selectRecentDate(email) == null) {
        return date;
    }
    return this.recordMapper.selectRecentDate(email);
}

// 기록장 : 목표 개수와 운동 개수 불러오기
public CountEntity getCount (String email, Date date) {

    return this.recordMapper.selectCountByEmail(email, date);
}

// 기록장 : Photo, Diary, Add 불러오기
public ElementEntity getRecords (String email, Date date) {

    ElementEntity existingRecord = this.recordMapper.selectRecordByEmailDate(email, date);

    return existingRecord;
}

// 왼쪽 화살표 눌렀을 때 (이전 날짜로 가기)
public Date getPreviousDate(String email, Date date) {
    return this.recordMapper.selectPreviousDate(email, date);
}

// 오른쪽 화살표 눌렀을 때 (다음 날짜로 가기)
public Date getNextDate(String email, Date date) {
    return this.recordMapper.selectNextDate(email, date);
}
- Mapper, xml
// 디비에 저장된 최근 날짜 불러오기
Date selectRecentDate (@Param(value = "userEmail") String userEmail);

// 기록장 작성한 거 불러오기 : 사진, 메모
ElementEntity selectRecordByEmailDate (@Param(value = "userEmail") String userEmail,
                                         @Param(value = "todayDate") Date todayDate);

// 기록장 : 이미지 불러오기
ElementEntity selectImageByEmailDate (@Param(value = "userEmail") String userEmail,
                                      @Param(value = "todayDate") Date todayDate);

// 기록장 작성한 거 불러오기 : count
CountEntity selectCountByEmail (@Param(value = "userEmail") String userEmail,
                                @Param(value = "todayDate") Date todayDate);

// 왼쪽 화살표 눌렀을 때 (이전 날짜로 가기)
Date selectPreviousDate(@Param(value = "userEmail") String userEmail,
                        @Param(value = "todayDate") Date todayDate);

// 오른쪽 화살표 눌렀을 때 (다음 날짜로 가기)
Date selectNextDate(@Param(value = "userEmail") String userEmail,
                    @Param(value = "todayDate") Date todayDate);
// 기록장의 가장 최근 날짜
<select id="selectRecentDate"
resultType="java.util.Date">
select `today_date` AS `todayDate`
FROM `dios_record`.`counts`
WHERE `user_email` = #{userEmail}
ORDER BY `today_date` DESC
LIMIT 1
</select>
// 기록장 : 목표 개수와 운동 개수
<select id="selectCountByEmail"
resultType="com.blackgreen.dios.entities.record.CountEntity">
select `squat_count` AS `squatCount`,
`squat_setting` AS `squatSetting`,
`lunge_count` AS `lungeCount`,
`lunge_setting` AS `lungeSetting`,
`push_up_count` AS `pushUpCount`,
`push_up_setting` AS `pushUpSetting`
FROM `dios_record`.`counts`
WHERE `user_email` = #{userEmail}
AND `today_date` = #{todayDate}
LIMIT 1;
</select>
// 기록장 : Photo, Diary, Add
<select id="selectRecordByEmailDate"
resultType="com.blackgreen.dios.entities.record.ElementEntity">
select `user_email` AS `userEmail`,
`image` AS `image`,
`image_type` AS `imageType`,
`diary` AS `diary`,
`add` AS `add`
FROM `dios_record`.`record_elements`
WHERE `user_email` = #{userEmail}
AND `today_date` = #{todayDate}
LIMIT 1
</select>
// 이전 날짜
<select id="selectPreviousDate"
resultType="java.util.Date"><![CDATA[
SELECT `today_date`
FROM `dios_record`.`counts`
WHERE `user_email` = #{userEmail}
AND `today_date` < #{todayDate}
ORDER BY `today_date` DESC
LIMIT 1
]]></select>
// 이후 날짜
<select id="selectNextDate"
resultType="java.util.Date"><![CDATA[
SELECT `today_date`
FROM `dios_record`.`counts`
WHERE `user_email` = #{userEmail}
AND `today_date` > #{todayDate}
ORDER BY `today_date`
LIMIT 1
]]></select>기록장에 들어가는 방법은 운동 후, RECORD 버튼을 눌러서 기록과 동시에 자동으로 들어가는 방법과, 로그인 후 홈 화면에서 바로 들어가는 방법이 있다. 운동 후 자동으로 들어가는 방법은 기록이 되면서 dt 가 현재 날짜로 설정되어 들어가지면 되고, 홈 화면에서 기록장으로 들어가려면 현재 날짜가 아닌 DB에 저장된 가장 최근 날짜로 들어가져야 한다(운동을 안 한 날짜는 DB에 저장이 되지 않기 때문이다.).
근데 이렇게 하면 막 가입한 사용자, 즉 DB 에 레코드가 하나도 없는 사용자는 기록장에 들어가면 에러가 뜬다. 그렇기 때문에 service 에서 기록장에 내용이 하나도 없을 때는 현재 날짜로 들어갈 수 있게 해 두었다. 또, 기록장에 들어갈 내용이 없어도 에러가 뜬다! 그래서 빈 엔티티를 만들어서 기록이 없으면 default 값이 뜨도록 한다.
기록장 페이지의 session 인 user(email) 을 기준으로 뽑은 레코드 중 날짜를 내림차순하여 가장 먼저 오는 레코드를 (LIMIT 1) 뽑으면 기록장에 기록한 날짜 중 가장 최근 날짜를 뽑을 수 있다.
기록장에 들어가는 목표 개수, 운동 개수 / Photo, Diary, Add 는 테이블이 두개로 나뉘어져 있기 때문에 select 를 따로 만들어 주었다.
그리고 가장 중요한 화살표를 눌렀을 때, 해당 날짜의 기록이 출력되게 하는 건 이 전 날짜와 이 후 날짜 따로 쿼리를 짰다. 현재 페이지의 날짜를 기준으로 이 전 날짜, 이 후 날짜 모두 LIMIT 1 을 해주어 바로 전 날, 바로 다음 날 하나씩만 뽑는 것이다. 그러려면 전 날은 내림차순으로 정렬된 날짜 중 하나를 뽑아야 하고, 다음 날은 오름차순으로 정렬된 날짜 중 하나를 뽑아야 한다.
이 과정에서 부등기호 "<" 와 ">" 가 사용 되었는데, xml 에서는 그냥 사용할 경우에 태그로 인식하는 경우가 종종있다. '태그가 아니고 실제 쿼리에 필요한 코드' 라는 것을 알려줘야 한다. 그래서 "<![CDATA[ 쿼리 내용 ]]>" 를 넣어줬다.
✔️ <![CDATA[ 쿼리 내용 ]]>
: <>(부등호),&(앤드),||(오아) 등을 닫는 부등호가 아니라 문자열로 처리하라는 뜻
Controller 에서 이 전 날짜가 없거나 이 후 날짜가 없으면 null 값을 넣도록 삼항식 코드를 짰다. 이 부분은 modelAndView 에 넣어서 html로 넘어간다.
- HTML
<div class="date-container">
    <a class="left-container" th:if="${previousDate != null}"
       th:href="@{./recordBook (dt=${previousDate})}">
        <i class="left fa-solid fa-caret-left"></i>
    </a>
    <a class="date" th:text="${date}"></a>
    <a class="right-container" th:if="${nextDate != null}"
       th:href="@{./recordBook (dt=${nextDate})}">
        <i class="right fa-solid fa-caret-right"></i>
    </a>
</div>
타임리프 if 문을 사용하여 왼쪽 화살표(이 전 날짜)는 previousDate 가 null 이 아닐 때만 보이게 하고, 오른쪽 화살표(이 후 날짜)는 nextDate 가 null 이 아닐 때만 보이게 했다. 이렇게 처리하지 않고 이 후 날짜와 이 전 날짜가 더 이상 없는데도 화살표를 보이게 하면 눌렀을 때 에러난다.

null 이 아니면 th:href="@{./recordBook (dt=${nextDate})}", th:href="@{./recordBook (dt=${previousDate})}" 처리를 해서 해당 날짜의 레코드를 select 하는 페이지로 이동하도록 한다.
'웹개발 > DIOS' 카테고리의 다른 글
| [웹개발 - DIOS] 주문 페이지 (0) | 2023.02.25 |
|---|---|
| [웹개발 - DIOS] 장바구니 페이지 (2) (0) | 2023.02.25 |
| [웹개발 - DIOS] 장바구니 페이지 (1) (0) | 2023.02.24 |
| [웹개발 - DIOS] Teachable Machine 를 이용한 운동 횟수 세는 페이지 / Teachable Machine / 티처블머신 / 머신러닝 (0) | 2023.02.23 |
| [웹개발 - DIOS] 운동 목표 개수 설정 페이지 (0) | 2023.02.22 |


